Applicable Versions:
TOS 4/5/6
Applicable Models:
All models
Issue Description:
After installing PLEX, there is uncertainty on how to add and scan data in TNAS shared folders.
Cause of Issue:
Due to differences in permission management across different system versions, if permissions are not set correctly, the desired shared folder cannot be selected.
Setup Method:
TOS 6:
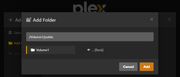
1. Install the PLEX or EMBY application.
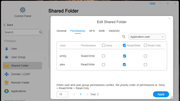
2. Go to the TOS Control Panel, enter the Shared Folders module, and edit the shared folder you want to scan (e.g., public).
3. Set the permissions of the application users 'emby' and 'plex' to read and write.
![Image]()
4. Then open the application, select the public shared folder to add, and start scanning.
![Image]()
TOS 5:
1. Install the PLEX or EMBY application.
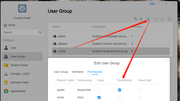
2. Go to the TOS Control Panel, enter the User Groups module, edit the 'meida' user group, and set read and write permissions for the shared folder you want to scan (e.g., public).
![Image]()
3. Open the application, select the public shared folder to add, and start scanning.
TOS 4:
1. Install the PLEX or EMBY application.
2. After opening the application, select the shared folder you want to scan. If the shared folder is on Volume 1, choose the folder under `/mnt/md0/`; if it's on Volume 2, choose the folder under `/mnt/md1/`.
For example, if the public folder is on Volume 1, select `/mnt/md0/public`.
![Image]()
TOS 4/5/6
Applicable Models:
All models
Issue Description:
After installing PLEX, there is uncertainty on how to add and scan data in TNAS shared folders.
Cause of Issue:
Due to differences in permission management across different system versions, if permissions are not set correctly, the desired shared folder cannot be selected.
Setup Method:
TOS 6:
1. Install the PLEX or EMBY application.
2. Go to the TOS Control Panel, enter the Shared Folders module, and edit the shared folder you want to scan (e.g., public).
3. Set the permissions of the application users 'emby' and 'plex' to read and write.
4. Then open the application, select the public shared folder to add, and start scanning.
TOS 5:
1. Install the PLEX or EMBY application.
2. Go to the TOS Control Panel, enter the User Groups module, edit the 'meida' user group, and set read and write permissions for the shared folder you want to scan (e.g., public).
3. Open the application, select the public shared folder to add, and start scanning.
TOS 4:
1. Install the PLEX or EMBY application.
2. After opening the application, select the shared folder you want to scan. If the shared folder is on Volume 1, choose the folder under `/mnt/md0/`; if it's on Volume 2, choose the folder under `/mnt/md1/`.
For example, if the public folder is on Volume 1, select `/mnt/md0/public`.

Statistics: Posted by TMRyan — Today, 11:10